Introduction
In the realm of modern artificial intelligence, Large Language Models (LLMs) like ChatGPT and their kin represent a revolutionary leap. These models have the extraordinary ability to understand, generate, and interact with human language in ways that were once the realm of science fiction. Their applications span diverse fields, from creative writing aids to complex problem-solving tools in technical domains.
However, despite their remarkable capabilities, the standard use of LLMs, typically via cloud-based services, presents limitations, particularly in terms of customization and data privacy. This is where our interest lies: harnessing the power of LLMs in a manner that overcomes these constraints. We envision a scenario where these models
- not only run offline, ensuring data security and operational independence
- but are also fine-tuned with domain-specific knowledge
This approach promises a tailored AI experience, where the model’s responses are aligned with the specific needs and nuances of our domain. In the world of adapting and customizing LLMs, two primary methodologies stand out:
- Fine-tuning
- Retriever-Augmented Generation (RAG)
Fine-tuning involves training an existing model on a new, domain-specific dataset. RAG represents a different approach. It combines the generative power of models like ChatGPT with external knowledge retrieval, enabling the model to pull in information from various sources as it generates text. While this article delves into model fine-tuning, the potential of RAG is something we aim to explore in future writings.
Running a Model locally
Before diving into the details of LLM fine-tuning, the initial step involves running and downloading the model. This is where oogaboogas web- ui comes into play. As a web-based user interface, it serves as a platform for interacting with language models, especially those available on Hugging Face. It simplifies the process of downloading, running, and fine-tuning large language models, making them accessible to a wider audience.
It’s important to note that we won’t be detailing the installation process step-by-step. The reason for this is straightforward: oogaboogas web-ui is a tool under continuous development, meaning its installation process and features are subject to change. Providing a detailed guide today might become obsolete tomorrow as the tool evolves. However, to give you a general idea, the installation process typically involves these essential steps:
- Downloading from GitHub: This is where your journey begins, by obtaining the latest version of the software from its GitHub repository.
- Running the Installation Script: After downloading, you’ll execute an installation script depending on your operating system (e.g. start_windows.sh). This script is user-friendly and will prompt you to answer a few questions, such as the type of graphics card available in your system.
- Access via Browser: Once installed, it operates through a web browser interface, making it conveniently accessible and easy to navigate via http://127.0.0.1:7860.
After installation, you will probably see something like this:
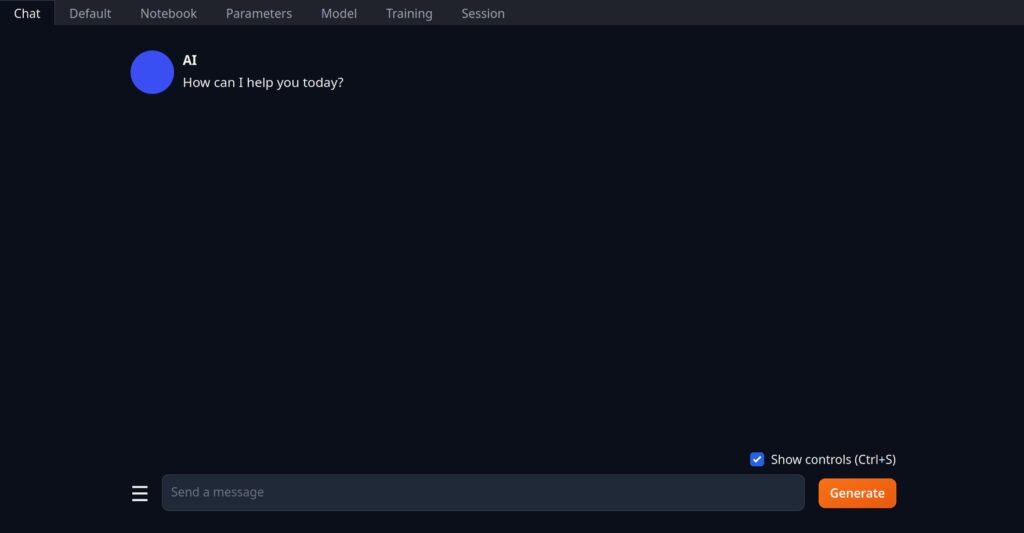
The sections at the top of the screen allow the user to chat, generate text, download or fine a model.
Selecting a Model
First, we have to select a proper model. This can be tricky:
- Models need different backends to load them (e.g. Transformer, llama.cpp, AutoAWQ, etc.). The web-ui only supports fine-tuning for Transformer based models.
- Not every model supports CPU offloading so it is best practice to select a model which fits into the VRAM of your GPU. A hint regarding VRAM consumption can be found in the models name: A 7 billion parameter model (7B) is smaller than a 50 billion parameter model (50B), etc.
- While being fine-tuned, models consume additional VRAM depending on batch size and other tuning parameters. Therefore, you should select a model which does not completely eat up your VRAM.
- Model size can be 10GB and more. If you have a slow internet connection, playing around with different models can be very time consuming. 😉
We selected GPT2-XL with 1.5 billion parameters. One of the key reasons GPT-2 stands as a preferred model is its suitability for rapid prototyping. Unlike its more extensive successors (GPT-3 or Llama2), GPT-2 requires significantly less memory, making it a viable option for a wide range of GPUs (in our case a Nvidia 2070 RTX with 8GB of VRAM). This allows for more flexible experimentation and development, as it can be trained on hardware that might not support larger, more demanding models. Additionally, the reduced memory footprint of GPT-2 translates to faster training times.
Fine-Tuning
To further reduce the models memory consumption, we loaded GPT2 with 4-bit quantization. Normally, deep learning models use 32-bit floating-point numbers (float32) for their weights and computations. Quantization involves converting these 32-bit numbers into a lower precision format, such as 4-bit integers, to reduce the model’s size and speed up inference. While quantization can lead to a smaller and faster model, it may also result in a slight drop in accuracy or model performance. In the context of rapid prototyping and training, using a quantized model like GPT-2 with “load in 4-bit” can be advantageous. It allows for faster iterations and testing, as the model requires less computational power and memory. This can be particularly beneficial when experimenting with different configurations or training on hardware with limited capabilities.
Training Data
For the fine-tuning of GPT-2 in our project, we chose a specific and distinctive dataset: a text focused on the Copper co-processor of the Amiga computer. This choice was strategic for several reasons. Firstly, the subject matter of the Copper co-processor is highly specialized and unlikely to be present in the original GPT-2 training data. This absence makes it an ideal case for testing the efficacy of our fine-tuning process. By training GPT-2 on this niche content, we can clearly observe the model’s ability to adapt and generate text on topics that were previously outside its scope of knowledge.
The dataset installation is straight forward: Simply copy a text file into training/datasets/your folder. In addition to raw text data, leveraging formatted datasets can be highly beneficial in the fine-tuning process of language models like GPT-2. Formats such as those used in the Alpaca chatbot framework offer structured and context-rich data, which can be instrumental in developing more sophisticated conversational AI capabilities. These formatted datasets typically include dialogues or exchanges that are annotated or structured in a way to provide clear conversational context and intent:
[
  {
    "instruction": "Describe the amiga copper coprocessor.",
    "input": "",
    "output": "The Copper is a general purpose coprocessor that resides in one of the Amiga's custom chips. It retrieves is instructions via direct memory access (DMA). The Copper can control nearly the entire graphics system, freeing the 68000 to execute program logic; it can also directly affect the contents of most of the chip control registers. It is a very powerful tool for directing mid-screen modifications in graphics displays and for directing the register changes that must occur during the vertical blanking periods. Among other things, it can control register updates, reposition sprites, change the color palette, update the audio channels, and control the blitter."
  }
]
However, since a copper description was not available in this format, we were sticking to raw text data.
Training Process
The web-ui does not modify the model directly. Instead, it leverages a method known as LoRA, or Low-Rank Adaptation. Unlike traditional fine-tuning techniques that directly alter the entire model, LoRA takes a more nuanced approach. It focuses on modifying only specific parts of the model’s neural network. This is achieved by introducing low-rank matrices that adjust the weights of the pre-trained model, allowing for targeted changes without the need to retrain the entire network. An important step in this process is the post-tuning requirement to load the LoRA files separately. This ensures that the model incorporates the newly trained data and reflects the fine-tuning effectively.
To fine-tune our GPT-2 model using LoRA, specific tuning parameters were adjusted. These adjustments directly influence the efficiency and efficacy of the fine-tuning process:
- LoRA Rank: We set the LoRA Rank to 400. This parameter determines the rank of the low-rank matrices used in LoRA, essentially controlling the degree of modification applied to the model’s weights. A higher rank allows for a more nuanced and detailed adaptation of the model.
- LoRA Alpha: We configured LoRA Alpha to 800. LoRA Alpha is determining the learning rate of these adaptations. By setting it to 800, we ensure that the model adapts at a rate that is optimal for integrating the new, domain-specific information without losing its pre-trained knowledge base.
- Batch Size: The batch size was set to 512. This size refers to the number of training examples utilized in one iteration. A larger batch size can lead to faster training but requires more memory. The chosen size strikes a balance between speed and resource utilization.
- Epochs: We decided on 200 epochs for the training process. An epoch is a complete pass through the entire training dataset. A higher number of epochs allows the model more opportunities to learn and adjust to the new data, though it also lengthens the training time.
After setting these parameters, the training process began with a VRAM consumption of about 5-6 GB on the GPU.
Results
To validate the effectiveness of our fine-tuning process using LoRA, we conducted a test by running the GPT-2 model both with and without the LoRA files. During this verification phase, we encountered a minor issue: the “chat” tab specifically designed for chat-like interactions in the web-ui was not functioning correctly. To circumvent this issue, we opted to use the “default” tab.
To guide the model and to focus its responses, we chose a specific prompt, structured to resemble a question-and-answer format about the Amiga computer. The prompt was as follows:
Amiga questions and answers

Question:
<our copper question>

Answer:
The following screenshot shows the result for a model without fine-tuning:
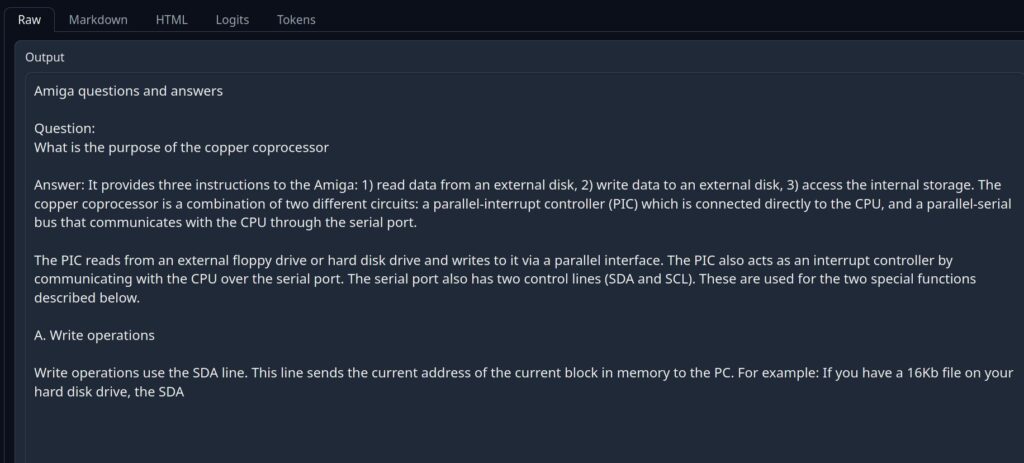
Obviously, the model is hallucinating and it has no clue regarding the copper. The next image shows the fine-tuned model behavior:
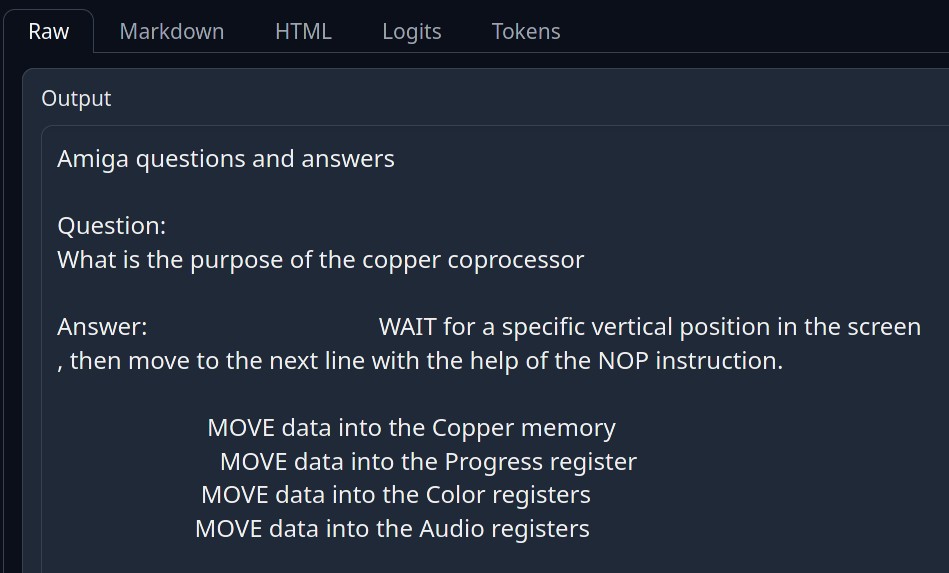
This is much better because the coppers main task is to use its WAIT instructions and MOVE data into custom chip registers. However, it is not very accurate or entirely correct and still contains hallucinations.
Conclusion
We successfully fine-tuned a GPT2 model using LoRA. However, the results, while promising, were not entirely convincing. The model still tends to produce hallucinations or inaccuracies when queried about the specific topic. This outcome, though not entirely as expected, provides valuable insights and directions for our future work. Our plans include:
- Exploring Alternative Models: We intend to experiment with other models, such as llama2, which might offer different strengths or be more conducive to our specific use case.
- Optimizing Parameters: There is room for optimization in our approach. For instance, revisiting the decision to use 4-bit quantization could be crucial. By adjusting such parameters, we might enhance the model’s accuracy and reduce the tendency to hallucinate.
- Comparing with RAG: Another intriguing avenue is to compare the results of our fine-tuning efforts with those achieved through Retriever-Augmented Generation (RAG).
In conclusion, while our initial foray into fine-tuning GPT-2 did not yield perfect results, it has opened up multiple pathways for further exploration. 🙂