Introduction
This is the second part of my blog article about bitmap rotation on AmigaOS. In the first part, we covered the necessary boiler plate code:
- Hiding the mouse
- Paint a bitmap on screen
- Convert bitmap planar buffer into chunky format and vice versa
In this article, the rotation algorithm itself is described.
Source Code
An example project which demonstrates my approach is available here on Github. It is build with gcc and vasm. To make things easier, I created a docker container for compilation.
Basic Structure
The example above has the following structure:
- Create two bitmaps and two PAL screens which will be used for double buffering.
- Create two byte arrays srcBuffer and destBuffer which will act as chunky video buffer.
- Create a 1 bit color table which contains black and red. Assign the color table to the two screens.
- Create bitmap rectBitmap. Paint a red square into this bitmap.
- Convert rectBitmap into a chunky buffer and store the result in srcBuffer.
- Run in a loop until mouse click:
- Add 10 to current rotation degree angle variable.
- If value of angle equals 360, assign 0 to angle.
- Rotate the content of srcBuffer by angle degrees and store the result in destBuffer.
- Convert chunky destBuffer back to planar format and store result in rectBitmap.
- Blit rectBitmap in the middle of the screen.
- Repeat 😉
Rotation Algorithm
The core of the example is the function rotate() which performs the actual rotation. It iterates over each pixel in srcBuffer, calculates its new coordinates and stores the corresponding color value at the new location in destBuffer. To rotate a pixel, the coordinates are multiplied with a rotation matrix:

This leads to the following equations:
x' = x * cos(alpha) - y * sin(alpha)
y' = x * sin(alpha) + y * cos(alpha)
So, the new coordinates can be achieved with a few multiplications, an addition, a subtraction and the trigonometric functions.
Example: A red pixel (5, 5) rotated by 20 degrees (to the left) would be moved to to the new location (2.9885, 6.4085). Since the pixel coordinates are integers, they have to be converted with a simple type cast (2, 6) or rounded (3, 6).
I executed the rotation algorithm for a single frame and got the following result:
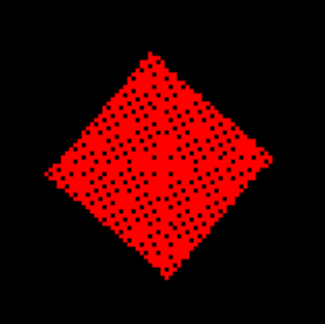
As you can see, the result contains a lot of black spots. Therefore, I changed the algorithm a little bit to switch colors when a pixel is moved to a position which is already in use by another pixel:
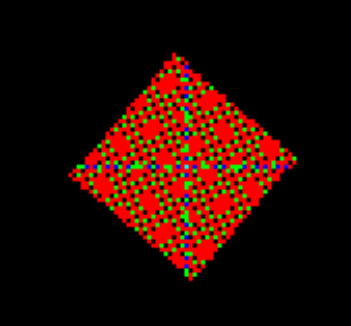
The result shows lots of coordinates which contain two (green) or three (blue) pixels while others remain empty. The reason for this behavior is the conversion from float to integer I mentioned above. I did not know how to face this problem and described my problem here on Stackoverflow. The answer was to perform the calculation “backwards”:
x = x' * cos(360 - alpha) - y' * sin(360 - alpha)
y = x' * sin(360 - alpha) + y' * cos(360 - alpha)
We iterate over the destination buffer, “pretend” it has been rotated already and calculate back to the “unrotated” square in srcBuffer. Afterwards, the pixel can be assigned the following way:
destBuffer[y' * width + x'] = srcBuffer[y * width + x];
The result looks much better and does not contain black pixels anymore. I have uploaded a screen capture of the rotation on YouTube which can be seen here.
Optimizations
The first implementations were really slow on my A1200. Therefore, I added a few optimizations to speed things up.
Lookup Tables
I do not calculate sine and cosine in real-time. Instead, I have added two (very basic ;)) python scripts
print("int sinLookup[] = {\\")
for i in range(0, 360, STEP):
    lookup_element = math.sin(math.radians(i))
    lookup_element = round(lookup_element, 4)

    if i + STEP >= 360:
        print("   FLOATTOFIX({})\\".format(lookup_element))
    else:
        print("   FLOATTOFIX({}),\\".format(lookup_element))
print("};")
which output C arrays like:
int cosLookup[] = {\
   FLOATTOFIX(1.0),\
   FLOATTOFIX(0.9848),\
   FLOATTOFIX(0.9397),\
   FLOATTOFIX(0.866),\
   FLOATTOFIX(0.766),\
   //...
};
Fix Point Arithmetic’s
The sine and cosine tables do not use the float datatype. Instead, they are integer arrays and invoke a FLOATTOFIX() macro for initialization. The idea here is to use fix point instead of floating point variables. This way, the runtime complexity of addition/subtraction/multiplication/division is next to integer arithmetic’s. In comparison, operations on float would be much more expensive without an floating point unit and at least my Amiga does not contain a FPU ;).
The macros to convert to fix point, multiply, etc. were found on coronax blog. The FLOATTOFIX() macro multiplies a float by the scaling factor 65536. Afterwards, it is cast to an integer without losing much precision. Additionally, the FIXMULT() macro is used to multiply two fix point variables. After the rotation is done, the fix point values can be converted back to integers via FIXTOINT().