Introduction
This is the first article in a series about
- Building a temperature and humidity sensor as an embedded IoT device
- Setting up cloud infrastructure to store and visualize its data
In this article, we will focus on the sensor and its firmware. The first basic implementation uses the following network topology:

As you can see, the feature set was stripped down a little bit. External connectivity like MQQT or a message bus are still missing and will be part of further blog articles. Instead, the sensor is directly accessed from within your WiFi. It provides the following features:
- Measure temperature and humidity
- Connect to a wpa2 protected WiFi access point and request an IP address via DHCP
- Can be discovered in the network via mDNS
- Provides a REST interface to allow smartphones, browsers. etc. to read its sensor values
Hardware
We will use two components:
- ESP32 micro controller
- DHT22 temperature and humidity sensor
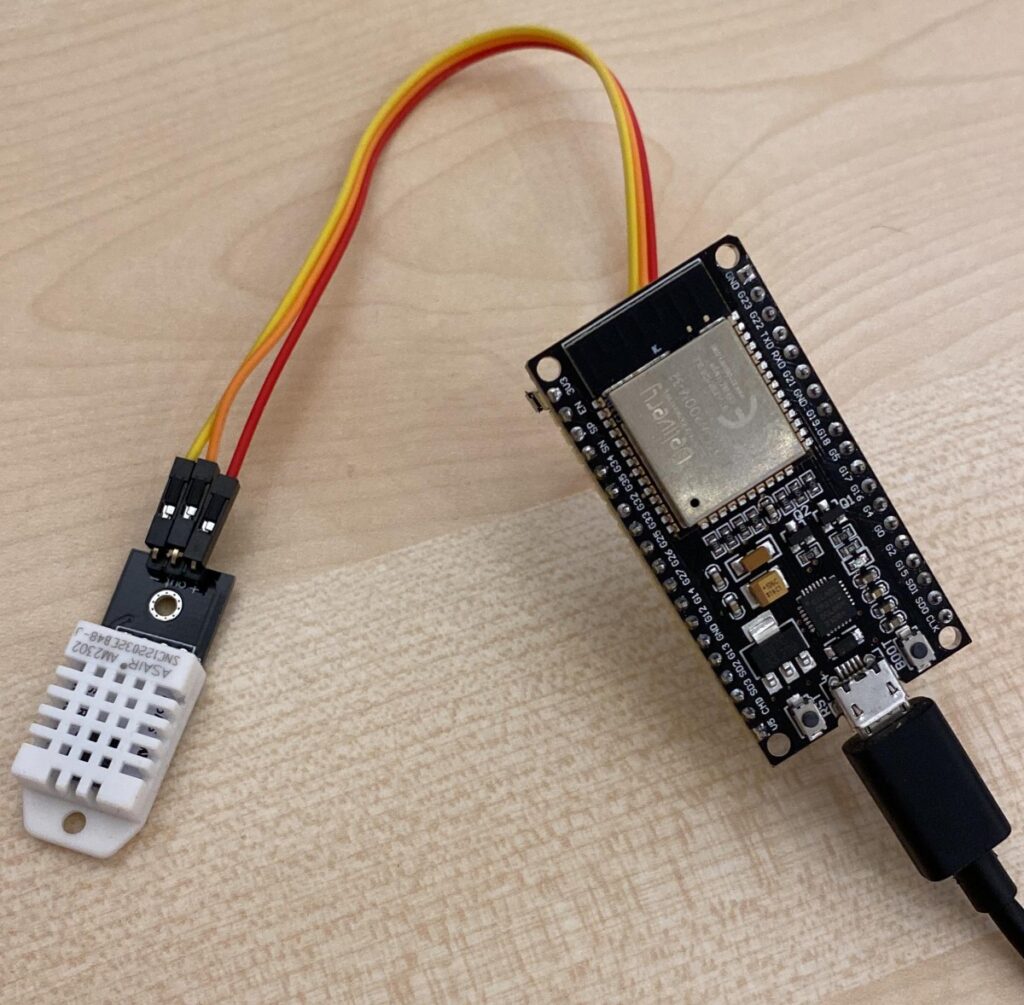
You can buy a common esp32 devkit which provides an USB port and exposes the micro controllers pins. The vanilla dht22 needs an additional pull-up resistor. If you want to spare some time, there are dht22 boards available which already contain the pull-up resistor. Afterwards, the overall setup is very simple:
- Connect vcc pin of the dht22 to a 3.3 volt port of the esp32 devkit (the sensor should also run with 5.0 volt but I have not tried)
- Connect gnd pin of dht22 to a gnd pin of the esp32 devkit
- Connect the data pin of the dht22 to a gpio of the esp32. My example code uses gpio 4, so if you are using a different pin you have to change the source code accordingly.
My setup looks like this:
Source Code
My example project is available here on Github. It is an esp-idf project so you have to use idf.py to build, flash and monitor. Details can be found here if you are new to esp32 programming. Since the esp32 connects to your local wifi and is available via mDNS discovery, run idf.py menuconfig and configure a few default values in section Cloud Sensor WiFi Configuration:
- CLOUDSENSOR_WIFI_SSID: Your access point.
- CLOUDSENSOR_WIFI_PASSWORD: Its password.
- CLOUDSENSOR_MDNS_HOSTNAME: Optional. Change this value, if you want to be discoverable by a different name.
DHT22 Library
We use a library written by Ricardo Timmermann released under Apache license. It takes care of the bidirectional data pin, sends a start signal and receives the data bits.
The dht22 library provides the function DHT_task() which is executed as a FreeRTOS task and runs in background. First, it configures the data pins GPIO via setDHTgpio(4). When the pin is configured, the tasks enters an infinite while loop:
- Read the current sensor values via readDHT()
- Sleep for three seconds and repeat
While this task fetches the current sensor values on a three seconds basis, they can be read via:
- getTemperature()
- getHumidity()
Fetching and reading sensor values is done in two different threads. To avoid race conditions, we added a mutex and use it in getTemperature(), getHumidity() and readDHT() the following way:
// Initialisation is done in DHT_task()
static pthread_mutex_t spiffsMutex;
// readDHT() writes into this variable when the current temperature is received
float temperature = 0.;

float getTemperature() {
    float temp_copy = 0;

    if (pthread_mutex_lock(&spiffsMutex) == 0) {
        temp_copy = temperature;
        pthread_mutex_unlock(&spiffsMutex);
    }
    return temp_copy;
}
Since the variable temperature is accessed by two threads, we make the read access mutually exclusive and store it in temp_copy before it is returned. The same applies for getHumidity() and readDHT().
Wifi
The WiFi driver connects to a WPA2 hotspot and expects a DHCP server to provide an IP address. Before the connection process can start, the driver has to be initialized:
ESP_ERROR_CHECK(esp_netif_init());
ESP_ERROR_CHECK(esp_event_loop_create_default());
esp_netif_create_default_wifi_sta();
Afterwards, the WiFi driver is configured:
wifi_config_t wifi_config = {
    .sta = {
        .ssid = CONFIG_CLOUDSENSOR_WIFI_SSID,
        .password = CONFIG_CLOUDSENSOR_WIFI_PASSWORD,
        .threshold.authmode = WIFI_AUTH_WPA2_PSK,
        .pmf_cfg = {
            .capable = true,
            .required = false},
    },
};

// apply config
ESP_ERROR_CHECK(esp_wifi_set_mode(WIFI_MODE_STA));
ESP_ERROR_CHECK(esp_wifi_set_config(ESP_IF_WIFI_STA, &wifi_config));
The ssid and password are references to the values configured by “idf.py menuconfig”. The authmode enforces WPA2 (who uses WEP or an open WiFi anyways ;). Finally we activate station mode which lets the esp32 connect to an access point instead of opening an AP by itself.
After the configuration is done, an event handler is registered and esp_wifi_start() invoked. The esp32 WiFi APIs work asynchronous here. The function esp_wifi_start() returns immediately and we have to react on events of the connection process in our event handler. Nevertheless, we want a synchronous behavior because the esp32 boot process should only continue after WiFi connection is up, otherwise nobody could read the sensor values. Therefore, we added the following features:
- Create an event group via xEventGroupCreate()
- Let the event handler set bit WIFI_CONNECTED_BIT in the event group after the connection was successful
- Wait via xEventGroupWaitBits() until WIFI_CONNECTED_BIT was set and continue control flow
Only after xEventGroupWaitBits() returns, we continue with mDNS and REST setup.
mDNS
When the sensor has got connectivity, we can start mDNS which provides network discovery. In its default configuration, the device is reachable from its hostname cloudsensor. This behavior can be changed via “idf.py menuconfig”. We also provide a txt record with some additional information. The main idea behind mDNS is:
- Later on, we may have multiple sensors in the network (e.g. one for each floor)
- In this case we will change their mDNS names accordingly
- A smartphone app (which will be part of further work) can easily find the sensors without knowing their IP addresses and display tuples like: sensor name – temperature/humidity values
The API of mDNS is straight forward:
ESP_ERROR_CHECK(mdns_init());
ESP_ERROR_CHECK(mdns_hostname_set(CONFIG_CLOUDSENSOR_MDNS_HOSTNAME));
ESP_ERROR_CHECK(mdns_instance_name_set("esp32 based temperatur/humidity sensor"));

mdns_txt_item_t serviceDeviceInfoData[3] = {
    {"board", "esp32"},
    {"version", "1.0.0"}};

ESP_ERROR_CHECK(mdns_service_add("cloudsensor-webserver",
                   "_http", "_tcp", 80, serviceDeviceInfoData, 2));
All we do in the code above is to initialize the driver, set a hostname, create a txt record and add it as a service.
Web Server and REST Interface
This part of the sensor provides a REST interface with the following layout:
belial@osiris ~ $ curl http://cloudsensor/data
{
        "temperature":  "27.2",
        "humidity":     "50.7"
}
It can be received with a GET operation. The code for the web server is based on the example from espressif. I added a handler for the endpoint “/data”:
// convert sensor values to strings
char temp[256];
char humidity[256];
snprintf(temp, 256, "%.1f", getTemperature());
snprintf(humidity, 256, "%.1f", getHumidity());
ESP_LOGI(TAG, "reading temp: %s", temp);
ESP_LOGI(TAG, "reading humidty: %s", humidity);

// create rest reply
cJSON *root = cJSON_CreateObject();
cJSON_AddStringToObject(root, "temperature", temp);
cJSON_AddStringToObject(root, "humidity", humidity);
const char *sensor_data = cJSON_Print(root);

// send to clieant and clean up
httpd_resp_set_type(req, "application/json");
httpd_resp_send(req, sensor_data, HTTPD_RESP_USE_STRLEN);
free((void *)sensor_data);
cJSON_Delete(root);
return ESP_OK;
First, we fetch temperature and humidity whose “getter” functions are now protected by a mutex as we saw earlier. Both floats are converted into a string. Afterwards, a JSON structure is created which contains both values and send to the client. Finally, we clean up. Caution: You have to be careful because certain memory is not freed automatically. To avoid memory leaks, this is done by hand.